
Airtable Email Automation helps you send emails automatically based on triggers like new records, status updates, form submissions, or scheduled events. Using Airtable’s built-in automations or integrations like Zapier and Make, you can streamline notifications, reminders, and email campaigns without coding. It saves time, reduces manual work, and improves workflow efficiency.
Airtable email automation lets you send emails automatically based on triggers like new records, status changes, or scheduled times. You can build these workflows using Airtable’s native automation feature or connect tools like Zapier, Make, and Gmail for more advanced campaigns. Setup takes minutes and requires no coding.
If you’re spending hours each week copying data from Airtable into your email tool, there’s a better way. Airtable’s built-in automation features can send emails for you—the moment a record changes, a deadline approaches, or a customer signs up.
This guide walks you through how to set up Airtable automated emails from scratch. You’ll learn how to build an email workflow, configure triggers, and connect external tools for more complex campaigns. We’ll also cover practical automation examples you can copy today.
Whether you’re managing a sales pipeline, sending project updates, or running a small marketing campaign, these techniques will save you time and reduce manual errors. Let’s get into it.
What is Airtable email automation?
Airtable email automation is the process of sending emails automatically based on conditions you define in your Airtable base. Instead of manually writing and sending each message, you create rules that trigger emails when something specific happens.
For example, you might set up a workflow that emails a client the moment their project status changes to “Complete.” Or you could schedule a weekly digest that summarizes new records added to a table.
Native automations work well for operational emails, while understanding how email marketing software works can help you build more advanced campaigns:
Airtable handles this in two main ways:
- Native automations: Built directly into Airtable, these let you send emails without any third-party tools.
- Integrations: Connecting Airtable to platforms like Gmail, Outlook, Mailchimp, or automation tools like Zapier and Make for more advanced functionality.
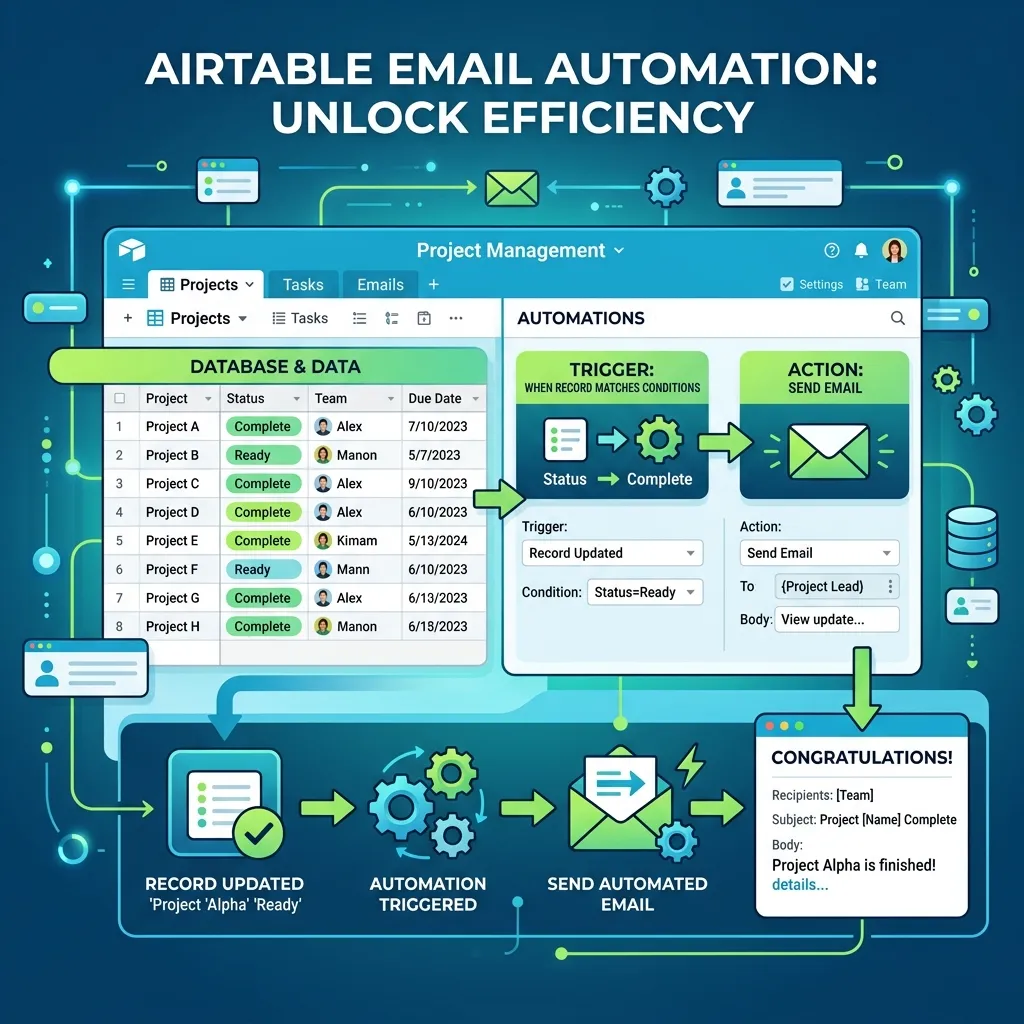
Both approaches rely on the same core idea—a trigger sets off an action, and that action sends an email.
How do Airtable email triggers work?
Every email workflow starts with a trigger. A trigger is the event that tells Airtable when to send an email. Understanding your trigger options is the key to building reliable automations.
Airtable’s native automation feature offers several trigger types:
- When a record is created: Sends an email each time a new row appears in your table.
- When a record matches conditions: Fires when a record meets specific criteria, like a status field changing to “Approved.”
- When a record enters a view: Triggers when a record appears in a filtered view.
- At a scheduled time: Sends emails on a recurring schedule—daily, weekly, or monthly.
- When a form is submitted: Sends a confirmation or notification after someone fills out an Airtable form.
Once a trigger fires, you add an action. For email automation, the action is “Send email.” You can also chain multiple actions together, such as updating a record and then sending a notification.
How to set up Airtable automated emails (step by step)
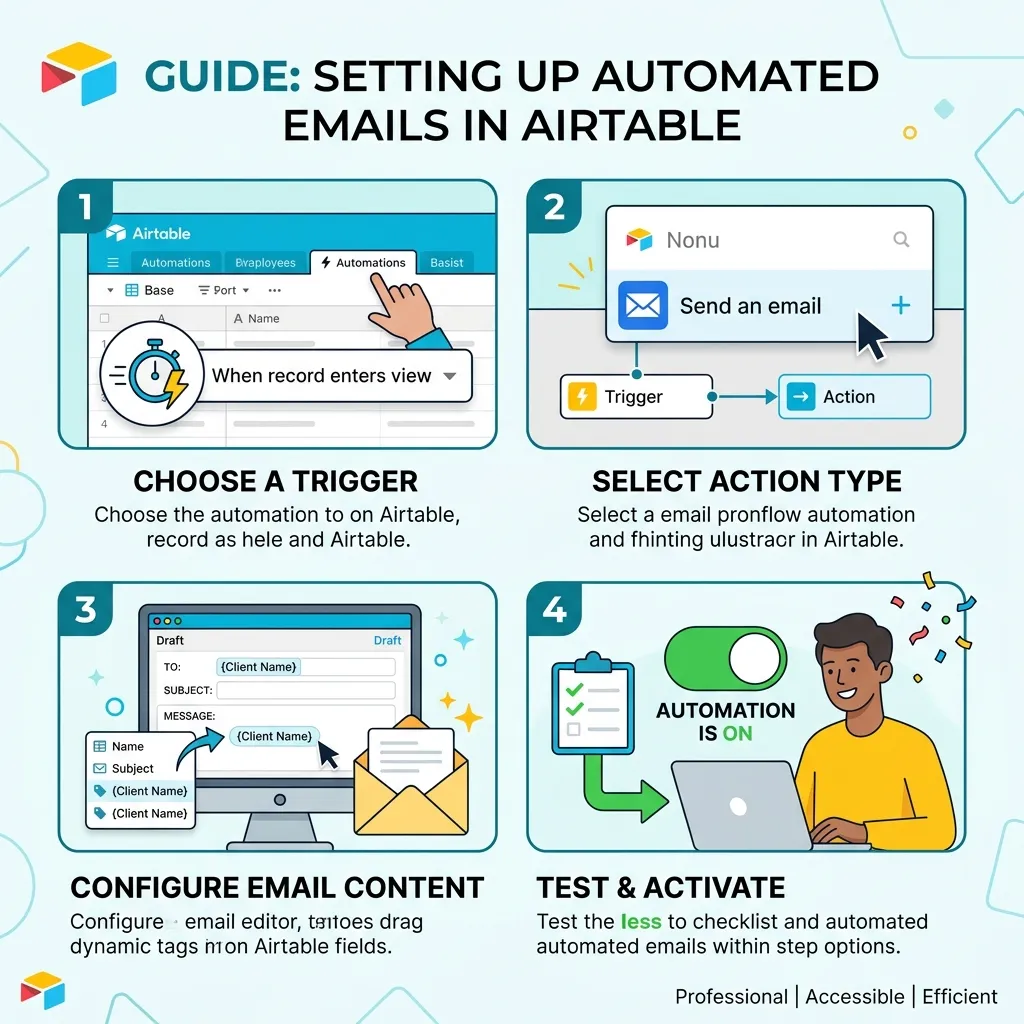
Setting up native email notifications in Airtable takes just a few minutes. Here’s how to do it.
Step 1: Open the automations panel
In your Airtable base, click the Automations button in the top toolbar. This opens the panel where you’ll build your workflow.
Step 2: Choose your trigger
Click Create automation, then select a trigger. If you want to email someone when a task is finished, choose “When record matches conditions” and set the condition to your status field equaling “Complete.”
Step 3: Add the send email action
Click Add action and select Send email. You’ll see fields for the recipient, subject line, and message body.
Step 4: Personalize your email
Airtable lets you insert dynamic field values into your email. Click the blue plus icon to add data from your records—like a customer’s name, order number, or due date. This turns a generic template into a personalized message.
For more ways to improve engagement, explore these email personalization strategies.
Step 5: Test and turn on
Before going live, run a test to make sure the email sends correctly and pulls the right data. Once you’re happy, toggle the automation on. From now on, Airtable handles the sending for you.
What are some practical Airtable automation examples?
The best way to understand Airtable email automation is to see it in action. Here are workflows you can build for common business needs.
Project status notifications
Trigger an email to stakeholders whenever a project moves to a new phase. When the “Status” field changes to “In Review,” your team gets notified instantly—no chasing required.
Form submission confirmations
When someone submits an Airtable form, send them an automatic confirmation. This works well for event registrations, support requests, or lead capture forms.
Deadline reminders
Use a scheduled trigger to scan your table each morning and email reminders for tasks due that day. This keeps deadlines visible without manual follow-up.
Weekly digest emails
Send a recurring summary every Monday that pulls together new records, completed tasks, or pending approvals. It’s a simple way to keep teams aligned.
Onboarding sequences
When a new customer record is added, kick off a series of emails that welcome them and share helpful resources. This is where Airtable starts to overlap with email marketing automation.
You can also build a complete email marketing funnel to nurture leads over time.
When should you use an Airtable email integration instead of native automations?
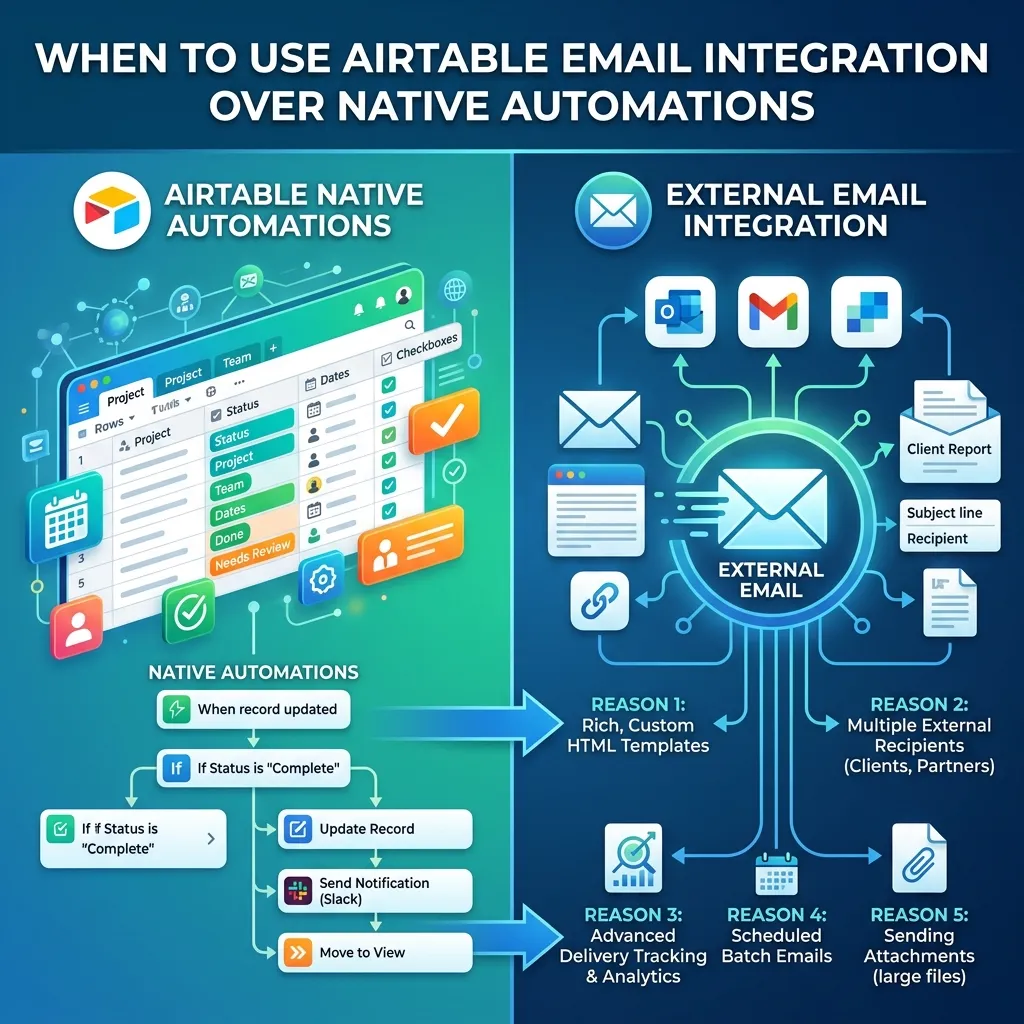
Airtable’s native email feature works well for straightforward notifications. But it has limits—you can’t design rich HTML templates, run drip campaigns, or track open rates. For those needs, an integration is the better choice.
Choose a third-party integration if any of these apply to you:
- You want branded, designed emails. Tools like Mailchimp and Outwrite-friendly editors give you control over layout and styling.
- You need email marketing automation. Platforms like Mailchimp, ActiveCampaign, or HubSpot support drip sequences, segmentation, and analytics.
- You’re connecting multiple apps. Zapier and Make link Airtable to thousands of other services, letting you build complex multi-step workflows.
Here’s a simple rule: use native automations for internal notifications and transactional emails. Use an integration when you need marketing campaigns, advanced design, or detailed reporting.
Connecting Airtable with Zapier or Make
Zapier and Make act as bridges between Airtable and your email platform. You set Airtable as the trigger (“new record created”) and your email tool as the action (“send campaign”). This unlocks workflow automation that native Airtable can’t handle alone, like sending emails through dedicated marketing platforms with full tracking.
How to build an Airtable email marketing automation workflow
If you want to run email campaigns directly from your Airtable data, follow this approach.
First, keep your contact data clean inside Airtable. Use a dedicated table for subscribers with fields for name, email, and any segments or tags you want to target.
Next, connect Airtable to a marketing platform using Zapier or a native integration. When a contact meets your criteria—say, joining a “New Leads” view—the integration adds them to a campaign in your email tool.
From there, your marketing platform handles the heavy lifting: sending sequences, tracking opens and clicks, and managing unsubscribes. Airtable remains your source of truth for contact data, while the email tool runs the campaigns.
This hybrid setup gives you the best of both worlds—Airtable’s flexible database with the power of a dedicated email marketing automation platform.
Putting your Airtable email workflow into action
Airtable email automation removes the manual work from staying in touch with your team and customers. Start small with a single native automation, like a status notification or form confirmation. Once you’re comfortable, layer in integrations to handle marketing campaigns and more complex workflows.
The key is matching the tool to the job. Native automations cover internal alerts and transactional emails, while integrations like Zapier, Make, and Mailchimp power full email marketing campaigns. Begin with one workflow today, test it thoroughly, and expand from there.
Frequently asked questions
Can you send emails directly from Airtable?
Yes. Airtable’s native automation feature includes a “Send email” action that lets you send messages without any third-party tools. You set a trigger, write your email, and Airtable sends it automatically when the trigger fires.
Is Airtable email automation free?
Airtable’s native automations are available on all plans, including the free tier, though the number of automation runs per month depends on your plan. Connecting external tools like Zapier or Mailchimp may require paid subscriptions to those services.
How many automated emails can Airtable send?
The limit depends on your Airtable plan. Free plans include a set number of automation runs per month, while paid plans offer significantly more. Each email sent counts as one automation run.
Can Airtable send email notifications to multiple people?
Yes. In the send email action, you can add multiple recipients in the “To,” “CC,” or “BCC” fields. You can also pull email addresses dynamically from linked records, making it easy to notify entire teams.
What’s the difference between Airtable automations and Zapier?
Airtable automations run inside Airtable and handle simple triggers and actions within your base. Zapier connects Airtable to thousands of external apps, enabling more complex, multi-step workflows across different platforms. Use native automations for basic needs and Zapier for cross-app integrations.
What is Airtable Email Automation?
Airtable Email Automation is a feature that automatically sends emails when specific triggers or conditions are met within an Airtable base.
Can I send emails directly from Airtable?
Yes. Airtable’s native automation feature allows you to send emails without using third-party tools for basic notifications and updates.
How does Airtable Email Automation work?
It uses triggers, such as new records or status changes, to automatically perform actions like sending personalized emails.
Is Airtable Email Automation free?
Airtable offers email automation on its plans, including limited automation runs on the free plan. Higher-tier plans provide more automation capacity.
Can Airtable Email Automation send personalized emails?
Yes. You can insert dynamic fields like names, project details, and due dates to personalize each automated email.
What are the best tools to extend Airtable Email Automation?
Popular tools include Zapier, Make, Gmail, Outlook, Mailchimp, ActiveCampaign, and HubSpot for advanced workflows and marketing automation.
Can I use Airtable Email Automation for marketing campaigns?
Yes, but for advanced email marketing features such as drip campaigns, segmentation, and analytics, it’s best to connect Airtable with platforms like Mailchimp or ActiveCampaign.
What are common use cases for Airtable Email Automation?
Common uses include project status updates, form confirmations, deadline reminders, customer onboarding emails, and weekly team reports.
How do I create an Airtable Email Automation workflow?
Create an automation by selecting a trigger, adding the “Send email” action, customizing the message with dynamic fields, testing it, and then enabling the workflow.
Why should I use Airtable Email Automation?
Airtable Email Automation saves time, reduces manual tasks, improves communication, minimizes errors, and helps businesses automate repetitive email workflows efficiently.

I'm Email Marketer who crafts targeted campaigns that drive engagement, nurture leads, and boost conversions. With a passion for creating personalized email strategies.


No Comments